Embossing/debossing with Cricut

I really love the fact that my current paper cutting machine gives me the option to choose or upload pretty much any digital image on the Design Space and cut it with the machine, as long as it fits the size limits. With the mechanical die cutting machines I would need to buy a separate die for every image. However, I do miss an embossing or debossing feature on my Cricut and have been searching for ways of getting a similar effect. What is that, you’re asking? Both methods refer to pressing or imprinting an image to a material. Embossing results in a design that’s raised up from the surrounding material, and debossing results in a design that’s stamped down or recessed into the surrounding material.

I have the Cricut Explore Air 2 and unfortunately it doesn’t have those features. I have been researching and exploring different options. One short tutorial suggests to use the foil transfer tool for debossing. I don’t have this tool, so I kept looking for alternatives.

Amazon.de: Cricut Foil Transfer Set
Amazon.co.uk: Cricut Foil Transfer Set

The closest function I found is scoring. To use this function, the machine needs a scoring stylus. In paper designs, the scoring line is generally used to create a folding line for spatial shapes like boxes.

Amazon.de: Cricut Scoring Stylus
Amazon.co.uk: Cricut Scoring Stylus

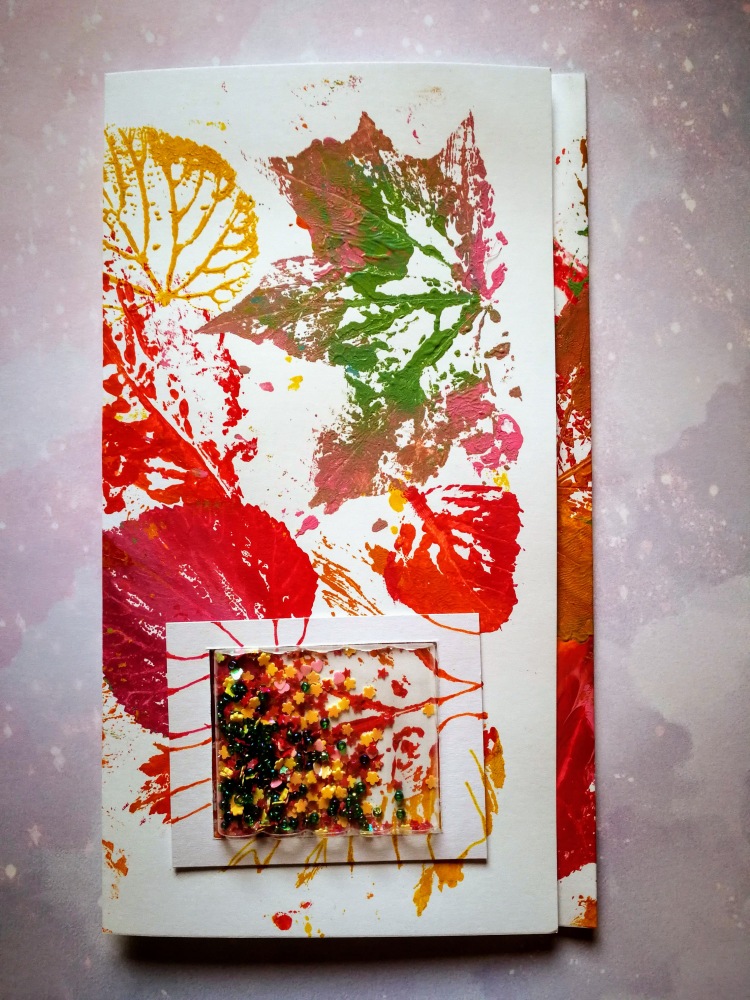
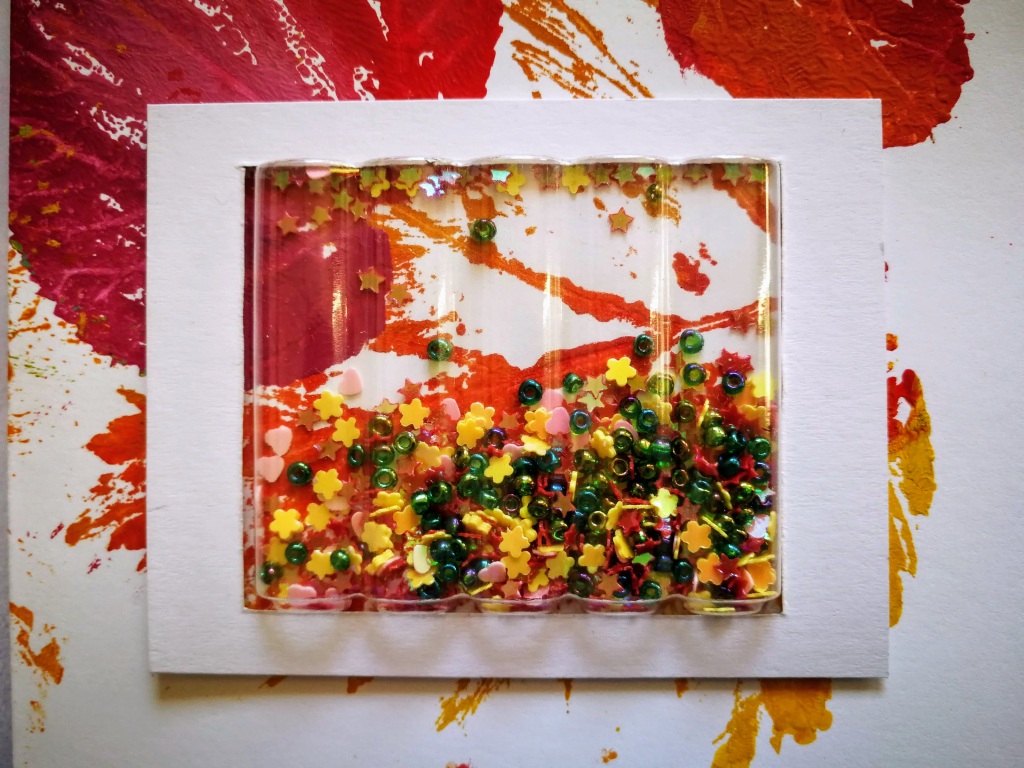
The Cricut Design Space allows the user to change a cutting line to scoring in the Operation menu and that is what I saw in most of the tutorials I found. When doing that, instead of cutting the selected shape, the machine will just score the lines with the stylus on the paper. As it is only a line and the stylus has quite a thin tip, it doesn’t allow you to process a whole shape or surface like that. I tried it out with a background pattern and I think it still gives an interesting effect to the paper.

What are the important steps?

  1. Choose or upload a cut image on Design Space and add it to the Canvas.
Leopard Pattern

2. Highlight the image and change the Operation (top left) from Basic Cut to Score. After that, it looks like the image is broken or incomplete, but this is just how the scoring line is represented on the Canvas.

Canvas Scoring Lines

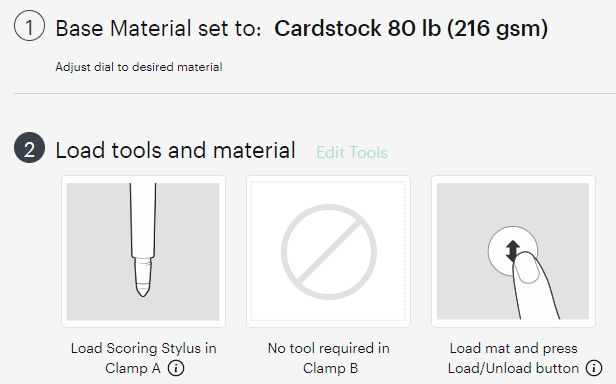
3. When you turn on the machine and go to Make it, make sure to have the correct Base Material settings and the Scoring Stylus attached. I forgot to change the material settings from my last vinyl cut and the first attempt wasn’t successful – the score line wasn’t deep enough and barely visible.

Scoring Settings

4. After that just follow the standard instructions on your Cricut. Below you can see my end result with the cardstock settings.

Scoring Result on Paper

If you want the real deal, the new Cricut Maker series has a specific function and tool for it. Jennifer Maker has covered this feature in one of her Youtube tutorials (I wrote about her in my post regarding free files for Cricut).

Amazon.de: Cricut Fine Debossing Tip
Amazon.co.uk: Cricut Fine Debossing Tip

For now, I will keep trying with the scoring stylus on Cricut Explore Air 2. I already have some more ideas for implementing scoring lines within images (for example: basketball, football). So far I have not found enough incentive to get a new Maker, but if you are using more materials than paper and vinyl, it is worth exploring the options of the new series.

Embossing/debossing Cricutil

Mulle väga meeldib, et minu praegune paberilõikamismasin annab mulle võimaluse Design Space tarkvaras valida ja lõigata digitaalseid pildifaile oma soovi järgi, kui see vastab suurusepiirangutele. Mehaaniliste paberilõikurite puhul peaksin ostma iga pildi jaoks eraldi lõiketera. Siiski tunnen ma oma Cricuti juures puudust reljeeftrükkimise funktsioonist ja olen otsinud võimalusi sarnase efekti saavutamiseks. Sa küsid – mis see on? Inglise keeles on levinud väljendid embossing ja debossing. Need meetodid viitavad kujutise pressimisele või materjalile trükkimisele. Embossing tekitab kujutise, mis on ümbritsevast materjalist ülespoole tõstetud (reljeef), ja debossing annab kujutise, mis on soonitud ümbritsevasse materjali.

Mul on Cricut Explore Air 2 ja kahjuks pole sellel masinaid neid konkreetseid funktsioone. Olen uurinud erinevaid võimalusi. Ühes lühikeses õpetuses soovitatakse kasutada graveeringu tegemiseks fooliumiülekande lisa. Mul pole seda tööriista, seega otsisin muid alternatiive.

Amazon.de: Cricut Foil Transfer Set
Amazon.co.uk: Cricut Foil Transfer Set

Ligilähedasem funktsioon, mille leidsin, on soonimine – scoring. Selle funktsiooni kasutamiseks vajab masin soonimispliiatsit – scoring stylus. Paberdisainide puhul kasutatakse soonimist tavaliselt ruumiliste kujundite (nt. karpide) peal voltimisjoone ettejoonistamiseks.

Amazon.de: Cricut Scoring Stylus
Amazon.co.uk: Cricut Scoring Stylus

Cricut Design Space tarkvara võimaldab Operation menüüs muuta lõikejoont (cut) soonimisjooneks (score) ja just seda nägin enamikus leitud õpetustes. Selle valikuga soonib masin kujundi lõikamise asemel lihtsalt äärejooned paberile. Kuna tegemist on vaid joonega ja pliiatsil on üsna peenike ots, ei võimalda see tervet kujundit või pinda töödelda. Katsetasin taustamustriga ja arvan, et see annab paberile ikka huvitava efekti.

Kuidas seda teha?

  1. Vali või lae üles lõikepilt (cut image) Design Space tarkvaras ja lisa see töölauale (Canvas).
Leopardi muster

2. Vajuta pildile ja muuda Operation menüüs Basic Cut funktsioon Score jooneks. Peale seda näeb pilt välja, nagu see oleks katki või poolik, aga see on lihtsalt punktiirjoon – niimoodi kujutab tarkvara voltimisjoont.

Punktiirjooned töölaual (Canvas)

3. Kui lülitad masina sisse ja valid Make it, et tööd alustada, veendu, et oleks valitud õige materjal ja sisestatud soonimispliiats. Ma unustasin oma viimase vinüüllõike materjaliseaded peale ja esimene katse ei õnnestunud – soonitud joon polnud piisavalt sügav ja vaevu nähtav.

Cricut seaded

4. Peale seda järgi lihtsalt Cricuti standardjuhiseid. Alloleval pildil on näha minu lõpptulemus.

Soonitud paber

Kui otsid ikka seda õiget efekti, pakub uus Cricut Makeri seeria selle jaoks konkreetset funktsiooni ja lisasid. Jennifer Maker on debossing funktsiooni käsitlenud ühes oma Youtube’i õpetuses (olen temast kirjutanud oma eelnevas postituses tasuta Cricuti failide teemal).

Amazon.de: Cricut Fine Debossing Tip
Amazon.co.uk: Cricut Fine Debossing Tip

Esialgu jätkan katsetusi Cricut Explore Air 2 ja soonimispliiatsiga. Mul on juba mõned ideed soonimisjoonte rakendamiseks piltide sees (nt. korvpall, jalgpall). Siiani pole ma leidnud piisavalt stiimulit uue Maker masina hankimiseks, kuid kui sina kasutad rohkem materjale kui paberit ja vinüüli, siis tasub tutvuda uue seeria võimalustega.

Crochet stress ball with filling granules

It’s been a long time since I was last inspired to pick up a crochet hook and yarn. For some reason, I remembered an amigurumi pattern that I have made many times before – a two-color filled heart. I have two great co-workers who are nice to talk to when times are tough (not only, of course) – they are like my life-size stress balls. I got the idea to make them their own little stress balls as a thank-you.

The pattern is still available on the wide web: Zhaya Designs – Two Tone Heart (also available in German). In my opinion, this is a brilliant technique and I have not come across any other patterns with such a smooth color change. Since only a single crochet stitch is needed when crocheting, the most difficult part is the color change:

  • At the end of the color row, you have to make sure that the last stich stays tight.
  • When starting with a new color, you have to adjust the thickness of the heart with the yarn – when bringing the yarn over from the opposite side, you have to leave a part loose so that the heart still remains spacious in the middle.

This time I used a new filling for the first time. So far I have only filled the toys with polyester fiberfill. For the stress balls I tried plastic granules (poly beads) instead to add a crunchy effect.

I crochet quite tightly, but this time I decided to pack the filling securely in nylon socks – so that the hearts can withstand even strong stress. This pattern requires 2 socks. Since the yarns run exactly in the middle of the heart due to the color change, the yarns form a partition in the middle and the filling must be placed in the two sides separately.

I progressed with the pattern as much as possible before adding the stuffing, so it wouldn’t get in the way. When it looked like the opening was still big enough to fit comfortably, I added some granules to the toe of the sock for weight, let the sock sink into the heart shape, and gradually added more filling as I continued crocheting. Fortunately, filling granules are heavier and easier to add than lightweight fiberfill. Before closing up the heart (sounds like cardiac surgery), I simply tied the socks in a knot above the filling and cut off the excess parts.

This pattern is probably one of my first amigurumi finds. It is so simple yet versatile, as it allows for different color combinations. It keeps finding a way to my heart 🙂

Heegeldatud stressipall graanulitega

Üle pika aja tekkis jälle inspiratsioon heegelnõel ja lõngad kätte võtta. Millegipärast tuli meelde üks amigurumi muster, mida olen varasemalt mitu korda teinud – kahevärviline täidetud süda. Mul on kaks toredat töökaaslast, kellega meil on hea arutleda, kui on rasked ajad (muidugi ka headel aegadel) – nad on nagu minu elusuuruses stressipallid. Mul tuli mõte teha neile tänutäheks oma väikesed stressipallid.

Muster on endiselt veebiavarustes olemas: Zhaya Designs – Two Tone Heart. Kes saksa keelt valdab, võib ka saksakeelse versiooni leida. See on minu arust täiesti geniaalne tehnika ja ma pole rohkem sellise sujuva värvivahetusega mustreid kohanud. Kuna heegeldamisel on vaja ainult kinnissilmust, siis kõige keerulisem ongi värvivahetus:

  • Värvirea lõpus peab jälgima, et viimane silmus jääks korralikult pingule.
  • Uue värviga alustamisel peab lõngaga reguleerima südame paksust – lõnga vastaspoolelt üle tuues peab jätma osa lahtiselt, et süda keskelt ikka ruumiline jääks.

Sel korral kasutasin esmakordselt uut täidist. Siiani olen mänguasju täitnud ainult padjatäidisega. Stressipallide jaoks otsustasin proovida hoopis graanuleid, mis ka mõnusalt krudisevad: Be Creative – Klaasgraanulid

Ma heegeldan küll üsna tihedalt, aga otsustasin seekord täidise igaks juhuks kindlalt nailonsokkidesse ära pakkida – et südamed ikka ka tugevama stressiga vastu peaks. Selle mustri puhul on vaja 2 sokki. Kuna lõngad jooksevad värvivahetuse tõttu täpselt keset südant, siis moodustub keskel lõngadest vahesein ja täidist tuleb panna kahele poolele eraldi.

Ma heegeldasin valmis võimalikult palju, enne kui täidist lisama hakkasin, et see ei häiriks. Kui tundus, et ava on veel piisavalt suur, et mugavalt toimetada, lisasin natuke graanuleid raskuseks sokivarbasse, lasin sokil südamepauna vajuda ja lisasin heegeldamise ajal järk-järgult veel graanuleid. Õnneks graanulid on raskemad ja neid on tööle hõlpsam lisada kui kerget polüestertäidist. Enne töö lõpetamist sidusin lihtsalt sokid graanulite kohalt sõlme ja lõikasin üleliigse osa ära.

See muster on vist üks mu esimesi amigurumi leide. See on nii lihtne, kuid samas mitmekülgne, kuna võimaldab erinevaid värvikombinatsioone. Ikka ja jälle leiab ta tee minu südamesse 🙂

Crochet Christmas sweater for chicken

This year the Christmas mood came with first snow… and a request for Christmas sweaters for chicken! One of my childhood friends already had 3 vests for her chicken and this time she asked if I feel like making some festive outfits. Of course I had just deleted all the chicken clothes’ tutorials from Pinterest because I did not expect to ever need them again. Luckily, this time it wasn’t hard to find those patterns. It seems that dressing up chicken is so popular that some people have turned it into a business and are selling their patterns.

To my pleasure I also found the guide I used for the first vests: She Radiated Joy – Crochet Chicken Sweater.

First crochet chicken vests

For some people it probably raises the question: why would chicken need sweaters? My childhood friend has Silkies and she takes them to events for educational purposes. The vests are accessories for different activities. For the Christmas version I used the previous pattern as a base and just played around with colors and additional elements. This time my friend also requested hats. It was quite fun to work on little suits – like making something for elves. I hope the costumes are a good fit and a nice sight for everybody.

Heegeldatud jõulukampsun kanale

Sellel aastal saabus jõulumeeleolu üsna omapäraselt – lisaks esimesele lumele akna taga potsatas mu messengeri kiri küsimusega, kas ma kanavesti viitsin heegeldada. Küsija oli juba 3 kanavesti omanik ja tahtis pühade puhul oma lemmikutele uhkemat rüüd – ta küsis seekord jõuluteemalisi kampsuneid. Muidugi olin ma just Pinterestis kõik vastavad õpetused ära kustutanud, sest ei arvanud, et pean kunagi veel kanadele riideid valmistama. Õnneks ei olnud seekord mustrite leidmine raske. Tundub, et kanade riietamine on juba nii populaarne, et osad on endale sellest isegi äriidee leidnud ja müüvad oma mustreid.

Leidsin enda rõõmuks ka õpetuse, mida esimeste vestide puhul kasutasin: She Radiated Joy – Crochet Chicken Sweater.

Esimesed heegeldatud kanavestid

Mõnel tekib ilmselt küsimus: milleks kanadele kampsun? Mu lapsepõlvesõbral on siidikanad, kellega ta huvi korral külas käib, et elamust ja arendavaid tegevusi pakkuda: Facebook – Loomadega koos. Need vestid on tal abivahendiks, et erinevaid tegevusi korraldada. Jõulude puhul ma võtsin aluseks sama mustri, mis eelmiste vestide puhul, ja lihtsalt mängisin värvide ja lisaelementidega. Ta soovis seekord ka mütsikesi. Oli üsna lõbus väikeste ülikondade kallal nokitseda – nagu meisterdaks midagi päkapikkudele. Ma loodan, et kostüümid sobivad ja on rõõmsaks vaatepildiks kõigile osalistele!

Autumn leaf prints

My little one is not a big fan of walking – it is too boring. It is possible to get her moving, but she always ends up with some extra activities or picking something off the ground. So this time her incentive was picking leaves. It is autumn and the leaves are starting to change colour and fall off the trees. We managed to get a nice selection.

To be honest, I think it was an incentive for me as well. One my friends recently sent me a photo of a pretty painting she made with her daughter. They made lots of leaf prints on a paper and the result looked like a modern fabric design. I’ve tried that before as well, but last year my little one didn’t have enough patience – so I was looking forward to trying it again.

I have been buying “Painting by Numbers” pictures recently and they always have more paint that the pictures actually require. Thanks to that we had quite a variety of little acrylic paint pots to play around with. With her plasticine set she also got a roll, which was perfect for rolling over the painted leaves, once we put them on the paper. With this simple equipment, we just let our imagination flow and painted all leaves. We ended up using both sides, to see the difference in patterns.

Colourful autumn leaves

Since there is a little friend’s birthday coming up, my little one got the idea of turning the painting into a card. Acrylic paint dries quite well and I liked the idea. She wanted to add glitter to the wet painting (I suspect she remembered our Christmas project from last year), but I think the picture is perfect as it is. However, I have been wanting to make more shaker cards, so I managed to add some extras – much to her liking. Allow me to present you – our autumn birthday card!

Leaf print birthday card

Who can guess, which package has been reused for the shaker element?

Shaker element

Sügisene lehemuster

Mu tibu ei ole suur kõndimise fänn – see on liiga igav. Teda on võimalik liikuma saada, kuid see lõppeb alati mingi lisategevusega või ta hakkab midagi maast korjama. Nii et seekord oli tema motivatsiooniprogrammiks lehtede korjamine. On sügis ja lehed hakkavad värvi vahetama ning puudelt langema. Meil õnnestus koguda kena komplekt.

Ausalt öeldes, mainitud programm oli ka mulle põnev. Mu sõbranna saatis mulle hiljuti foto ilusast maalist, mille ta koos tütrega tegi. Nad tegid paberile palju lehejälgi ja tulemus nägi välja nagu kaasaegne kangakujundus. Olen seda ka varem proovinud, kuid eelmisel aastal ei olnud mu tibul piisavalt püsivust – seega ootasin huviga, et saaks uuesti proovida.

Olen viimasel ajal ostnud maale, kus saab numbrite järgi värvida, ja neil on alati rohkem värvi, kui piltide jaoks tegelikult vaja on. Tänu sellele oli meil katsetamiseks üsna suur valik pisikesi akrüülvärvipotte. Oma plastiliinikomplektiga sai ta ka rulli, mis oli ideaalne värvitud lehtede silumiseks, kui need paberile panime. Selle lihtsa varustusega lasime lihtsalt oma kujutlusvõimel lennata ja värvisime kõik lehed ükshaaval üle. Lõppkokkuvõttes kasutasime lehtede mõlemat poolt, et mustri erinevust võrrelda.

Värvilised sügislehed

Kuna meil on tulemas väikese sõbra sünnipäev, tekkis tibul idee muuta maal õnnitluskaardiks. Akrüülvärv kuivab üsna hästi ja mulle hakkas see mõte meeldima. Ta tahtis märjale maalile lisada sädelevat pulbrit (ma kahtlustan, et ta mäletab meie jõuluprojekti eelmisest aastast), kuid minu arvates on pilt ideaalne sellisena, nagu ta on. Samas, ma olen tahtnud teha rohkem shaker-kaarte, nii et mul õnnestus siiski tema soov täita ja natuke põnevust lisada. Lubage mul esitada – meie sügisene sünnipäevakaart!

Lehemustriga sünnipäevakaart

Kes oskab arvata, mis pakend on taaskasutatud shaker-elemendi jaoks?

Shaker-element